Get started with Jekyll, GitHub, and Netlify

How this website was made (and my first ever blog post!)
Let’s build a website!
Objective
Build a free, open-source website.
Jekyll theme, code on GitHub, hosted by Netlify. You’ll reap the following benefits:
- A full history of your changes to any part of the website
- Write blog posts entirely in Markdown
- Free, automatic SSL
-
Quick deployments, including CI/CD by default
…and much more!
Prerequisites
You’re going to learn a lot but you’re also expected to come to the table with a few things. If you plan to follow along, be sure you have the following:
- Chocolatey
- Windows
- Familiarity with Git
- Familiarity with HTML/CSS/Markdown
- (Optional) VSCode
- (Optional) A custom domain name
While this tutorial was written with Windows in mind, the only difference per platform is how you install Jekyll and file paths.
Background
Getting my blog launched was a story of false starts. I started this project to push myself to learn new tools (read: play with new toys).
For years, I hosted a basic cover page website via a virtualized Nginx VM, shown below:

I’ve been toying with the idea of hosting my blog using the tools noted below ever since that old website was launched. I documented how I accomplished that goal for your viewing (reading?) pleasure.
Let’s dive right in with how you can copy my homework.
Overview
The puzzle pieces:
- Jekyll: Transforms plain text into static websites.
- GitHub: Where the static files used by Jekyll are hosted.
- Netlify: Detects changes pushed to GitHub, deploys a website, and handles HTTPS.
Jekyll
Installation
Want to skip the install step? See this blog post
You’ll first need to install some prerequisites:
- Install Chocolatey for Windows, a (great) software management solution.
- Install ruby:
choco install ruby - Close and re-open your preferred terminal (as admin) or refresh your environment before continuing.
Next up, you’ll need to install Jekyll and its prerequisites:
- Install bundler:
gem install bundler - Install Jekyll:
- Install mysys2:
choco install msys2 - Install the Ruby Installer Development Kit:
ridk install 3 gem install jekyllor your preferred theme (see note below)
- Install mysys2:
I would pause here if you’re interested in leveraging a custom theme, as Jekyll themes often provide all the files you’ll need to get started. My blog uses the HydeJack theme, described below.
Finally, let’s get your blog up and running:
- Navigate to the root folder for your blog, for example:
cd C:\Projects - Initialize your blog:
jekyll new myblog(skip this step if you’re using a custom theme) - Navigate to your blog:
cd myblog - Install required bundles:
bundle install - Start your blog:
jekyll serve - Browse to http://localhost:4000. Congrats, <you’re the blogger now>.gif 🎉
My Theme
My blog leverages the Hydejack Pro theme. The Hydejack documentation is a good place to get started if you’re interested. The main benefit I’ve found for the pro version of this theme is dark mode support.
If you want to use the free version, clone (or download) the Hydejack starter kit. You’ll find all the files required to get your blog up and running included.
Customization and Iteration
This is where you’ll spend most of your time, and this is never really done. You’ll want to add some personality to your website. Feel free to copy anything you like from my GitHub repo. Another good place to start is searching for popular Jekyll plugins.
At the very least, you’ll want to modify the _config.yml, Gemfile, and any included markdown files (e.g. about.markdown and index.markdown) to reference your information, rather than the defaults. I’d recommend spending some time looking through your site’s basic configuration(s).
To make changes to my blog, here’s the workflow that I usually follow:
- Navigate to your site: http://localhost:4000
- Make a change to a file such as
_config.yml - Did anything break? Did the updates take effect?
- ???
- Repeat
GitHub
Step one of three done already? Onwards to making your website open source!
Set Up Your Repository
Everything you are seeing on this website is hosted on my GitHub Repo. Here’s how you can do the same:
- Navigate to GitHub, creating an account if necessary.
- Navigate to https://github.com/new:
- Enter your desired repository name (ex: myblog) and an optional description.
- Initialize with a README
- Add .gitignore:
Jekyll - I normally select an
MIT License, but that’s up to you.
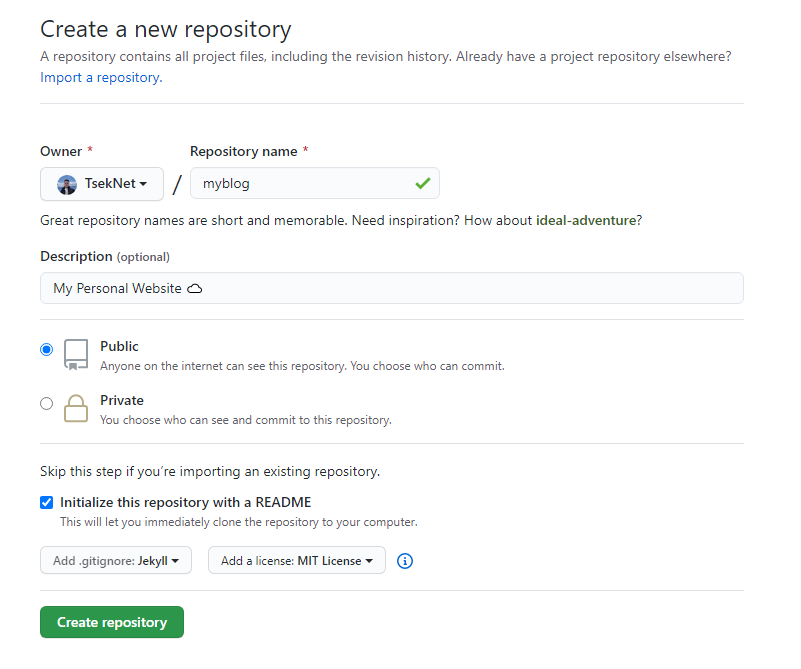
- Click
Create Repository - Clone your newly created repo via VSCode. See this post to learn how.
I manage my repo in VSCode, but this will work via the command line as well.
GitHub Files
You’ll want to modify a few commonly used GitHub files in VSCode locally.
-
README.md: This will be what everyone sees when they visit your repository. See makeareadme.com for tips on how to make awesome README files.Example:
This repo hosts my website, which leverages Jekyll and Netlify to serve this static website. -
.gitignore: Files not uploaded to GitHub, you’ll want to ensure the following exist at the very least.Example:
 _site
 .jekyll-cache
 Gemfile.lock
Open Source Your Website
To upload your website to GitHub:
- Copy the entire contents of your website into the new folder containing your repository.
- Commit your changes, then push your code to GitHub. Again, see this post for how that works.
- Navigate back to your GitHub repository to confirm the files were uploaded successfully.
Netlify CMS
Final stretch! Now let’s automate that website!
Netlify runs the jekyll build command for you against your GitHub repo, does SSL/optimization/CDN “magic”, and publishes your website.
The following steps will get you started, taken directly from the official Netlify Jekyll guide:
- Navigate to Netlify, creating an account if necessary.
- Add your new site by clicking
New site from Git - Link to your GitHub by following the prompts to connect, pick a repo, and build.
- Build options can be left as the default for Jekyll.
- Build your site. You should now see
Deploy in progress, and after a minute or so, your new website (with a custom URL) should be live!
Netlify vs GitHub Pages
Netlify has free custom domain support, automatic certificate management, handles minify for CSS and JavaScript, etc.
There are also paid features such as analytics, with no cookies required.
Netlify has a good comparison listed directly on their website if you’re interested in learning more.
Conclusion
By leveraging Jekyll, GitHub, and Netlify, you can reap all the benefits of code-based configuration, take for granted features such as automatic SSL, and have a beautiful website with tons of plugins available.
I hope you’ve found this guide useful. I appreciate your time in reading my first blog post!
If you run into any issues or have any suggestions, please reach out to me directly or leave a comment.
Now get out there and build that beautiful website 🏗️
Related Links
- Hosting Your Website With Github and Netlify
- Setup Custom Domain On Netlify
- How I customized Hydejack Theme
- Hydejack Showcase
- Jekyll Style Guide
- Jekyll Cheat Sheet